How to Reconnect Your New Counterpoint Server to CP-Commerce
Occasionally you may need to move your Counterpoint server onto another machine. When you do, you will need to connect your new Counterpoint server to the CP-Commerce sync. The sync is installed on our separate dedicated servers, the only installation needed on the Counterpoint server is for a VPN connection to it.
You will need:
- A VPN connection to our server
- SQL and Windows accounts for the CP-Commerce sync to use
- Any adjustments to your firewall(s) to allow the connection
If you have separate SQL and Counterpoint servers, this will need to be done for each machine.
VPN Connection to the Server
OpenVPN option
The easiest way to connect is via OpenVPN.
Before you start...
Configuration Files
- You will need to copy the OpenVPN configuration files from the original server to the new server. These files have the information needed to communicate with the CP-Commerce sync server.
- You can find these files under C:\Program Files\OpenVPN\config or C:\Program Files\OpenVPN\config-auto.
- The location just depends on which version of OpenVPN you were on – the files will work on any version.
- You should have the following files:
- cpcommerce.ovpn or another .ovpn file.
- ca.crt
- [name].crt and [name].key
- [name] may vary. This is often the name of the client or your business's name.
- If you are unable to locate these files, let the CP-Commerce team know and we can provide the files to you.
- You can find these files under C:\Program Files\OpenVPN\config or C:\Program Files\OpenVPN\config-auto.
Once you have the configuration files, you can begin Step 1.
Step 1) Installing OpenVPN
- Download OpenVPN for your Counterpoint Server's version of Windows and run the installer.
For Windows Server 2008, you will need OpenVPN 2.4.0-I602.
When you run the installer, it will prompt you to choose a setup type. Click Customize.

- If there is an X next to OpenVPN Service, click it and select Entire Feature will be installed on a local hard drive.
- Click the icon next to "Launch on User Logon" and select Entire feature will be unavailable.
- Finally, press Install Now.

Once it finishes installing, you are ready to set up OpenVPN to connect to the sync server.
Step 2) Setting Up the VPN
- On the old Counterpoint server, uninstall OpenVPN.Make sure you have the configuration files!
- Place the files from the old server in C:\Program Files\OpenVPN\config-auto.
- If there is not a config-auto folder, place them in C:\Program Files\OpenVPN\config instead.
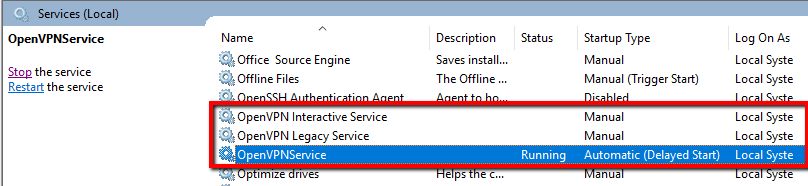
Step 3) Setting Up the OpenVPN Windows Service
In this step, we will be setting up the VPN connection to start automatically. This way if the computer restarts, the VPN connection will automatically reconnect.
- Go to Services.
- Press Windows Key + R.
- Type services.msc
- Press Enter.
- Change OpenVPN Interactive Service and/or OpenVPN Legacy Service to Manual.
- Change OpenVPN Service to Automatic (Delayed Start) and set all failure responses to Restart the Service
- Start OpenVPNService.
- The services menu should now look like the following:

Step 4) Test the Connection
- Open command prompt:
- Press Windows Key + R.
- Type cmd.exe.
- Press Enter.
- Type ipconfig and press enter.
- If a 10.8.0.X address is listed, the VPN is now set.
- If a 10.8.0.X IP address is not listed, see How to Restart the VPN service for other adjustments to make.
Troubleshooting OpenVPN
- Details to Check:
- Old Server
- The OpenVPN GUI in the system tray is off.
- If it's off, it will look like this:

- If it's off, it will look like this:
- The OpenVPNService is NOT running.
- The OpenVPN Interactive Service and Legacy Service are not running.
- The OpenVPN GUI in the system tray is off.
- New Server
- The OpenVPN GUI is closed.
- The OpenVPN Service is running.
- The OpenVPN Interactive Service and Legacy Service are not running.
- There is a 10.8.0.X IP address in the command prompt.
- Check that other programs are not interfering with the connection.
- Network
- Check that there are not any firewall rules blocking the connection.
- Old Server
If you have checked these steps and the connection is not back up, please provide the log file under C:\Program Files\OpenVPN\log.
Hardware VPN option
If you're using a hardware VPN instead, you'll need to contact support and provide the details we'll need to connect to your VPN. Then we'll make adjustments as needed.
SQL and Windows Accounts
Overview
We will need:
- a SQL account set to public and sysadmin.
- a Windows administrator account
Details
Please confirm that our Windows and SQL accounts still exist and have not been changed. If you are not sure what they are, let us know and we will provide the username(s) to check.
If you need to change our existing SQL and Windows accounts, we'll need the new credentials in order for the sync to connect.
Firewall
You will need to allow our connection through any firewalls you are using on the Counterpoint server or on your network.
If you are using OpenVPN to connect, Windows Firewall or any other firewalls on the Counterpoint server itself will need:
- Ports 1433 and 445 whitelisted to 10.8.0.0/24
If you are using any external firewalls on your network:
- Port 1194 will need to be whitelisted for our sync server's IP address. Each client has a separate sync server, contact CP-Commerce support to obtain the IP of your sync server.
Summary
Once you have this done and are connected,
- Please email us confirming:
Then we will make adjustments on our end for the sync to connect again.
Related Articles
Guide to Getting Started with CP-Commerce
We're glad you've decided to get started on your journey with CP-Commerce. Whether you're new to the Ecommerce world, or finally connecting your already successful Ecommerce website, we're here to help you prepare so we can get things running ...What is CP-Commerce?
CP-Commerce is a hosted integration platform that allows businesses to link their brick and mortar ERP system to an online ecommerce website. Currently the integration supports NCR Counterpoint 8.4.6+ as the brick and mortar ERP system and Magento ...Event Tickets: Create Your Event with CP-Commerce
Overview We are excited to help you create your online event and start selling tickets through the webstore. In this article, we will outline the flow of how your events will sync between platforms and the general steps to create your events. With ...CP-Commerce Catalog Mode
The CP-Commerce Catalog Mode module allows you to disable the cart and checkout on the site. This can be helpful if your store has a temporary closing, or does not take sales. Admin Configuration Differences Admin Configuration In Stores> ...Swapping Card Processors for Securepay with CP-Commerce
TABLE OF CONTENTS Overview Before Changing Counterpoint Magento Overview When changing credit card processors, you'll need to Finish processing any current transactions Enter your updated SecurePay credentials in the web store and in Counterpoint ...