How to Add Notices, Promotional Text, or Custom Scripts to Specific Pages with Widgets
This article will guide you through setting up a notice, promotional text, or custom scripts to a specific page.
For example, this article would be useful if you would like to add a banner or custom script on the cart or checkout page.
This article will not cover how to create the HTML for the notice or promotional text.
This article will only cover adding the notice or promotional text just below the header.
Step 1: Creating the Notice, Promotional Text, or Custom Script
- Login to your Magento Admin Panel.
- Go toContent>Blocks.
- This will bring you to the Blocks page. Click onAdd New Block:
- You should now be on the following page:

- Enable Block- This sets whether the block will show on the website.
- We recommend leaving this setting on. Later in this tutorial we will provide a guide on how to test the block before showing it on the page you want.
- Block Title- This is the name of the block. Make note of what you enter here.
- As an example of what to name the block, if you are creating a notice for checkout regarding shipping, you could name the block Checkout - Shipping Notice.
- Identifier- This is the ID for the block. This will not be used in this tutorial.
- While this will not be used in this tutorial. it is best to keep it similar to the block name. For example, if the block title is Checkout - Shipping Notice, you can enter checkout_shipping_notice.
- The ID cannot have spaces in it.
- Store View- By default, this should be selected as All Store Views. If it is not, click All Store Views.
- Text Area- The area surrounded in blue is where you will be entering the HTML for the block.
- If you are inserting a script, you will enter it in here.
- Below is a template for notices / promotional text:
<div class="notice-custom-block"><h3>Add your custom text here!</h3></div><style>.notice-custom-block {text-align: center;min-height: 90px;background-color: #FFFFFFcolor: #000000;}.notice-custom-block h3 {display: inline-block;margin-top: 2.2rem;font-size: 24px;}</style>You will need to adjust the design to your preferences, but this should give you a head start.
- Enable Block- This sets whether the block will show on the website.
- Once you have configured the settings in Step 4, press Save in the upper right hand corner.


Setting Up a Test Page
If you would like to preview the block you created before setting it up live, you can setup a test page. This will be where we place the block before it is live. We will cover how to place the block on that page in the next step.
- Go to Content> Pages.
- Click Add New Page.
- Configure the page. Below is clarification for each setting:
- Enable Page- This setting will need to be on to preview the block. After you finish the preview, you can disable the page.
- If you do not plan to preview the notice, you can disable this setting.
- Page Title- This setting will be the name of the page. We recommend setting this to something rather specific.
- For example, "Test Page for CPC - 11.13.2020"
- Above the text area, clickInsert Widget.
- Change widget type toCMS Static Block.
- ClickSelect Block.
- Click the block you created.
- PressInsert Widget.
- Enable Page- This setting will need to be on to preview the block. After you finish the preview, you can disable the page.
- PressSave.


While adding the block to the test page will not show the block in the same area as the final promotional or notification text, this should allow you to preview what the promotional content / notification will look like or to confirm the block will add the script.
If you are adding a custom script, you can verify by going to the page and checking in the inspector tool using CTRL + SHIFT + i.
Step 2: Creating the Widget
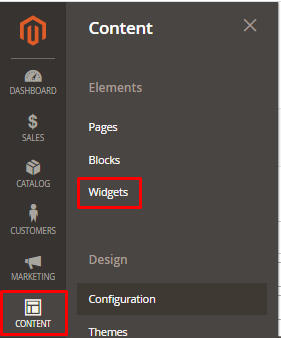
- Go to Content> Widgets.
- Click Add Widget.
- Change the Type to CMS Static Block.
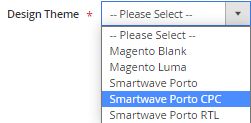
- Change Design Theme to Smartwave Porto CPC.
- Press Continue
- You should now see the following form:

- Set the Widget Title to something appropriate such as Checkout - Shipping Notice.
- Next to Assign to Store Views, click All Store Views.
- You can leave Sort Order blank.
- Click Add Layout Update.
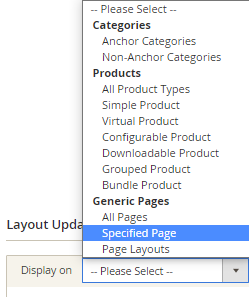
- Change Display On to Specified Page.
- Change Page to the specific page you would like it to display it on.
- For example, if you would like it shown at checkout, select One Page Checkout.
- If you are adding a conversion script for checkout, you can select One Page Checkout Success.
- This does not support specific CMS pages.
- Change Display On to Specified Page.
- Set Container to Main Content Top.
- This will add it just below the header of the page.

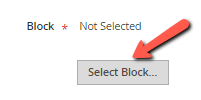
- On the left under Widget, click Widget Options.
- Click Select Block.
- Choose the block you created.
- Press Save.


Related Articles
How to Add Global Scripts to Your Website
This article will guide you through the process of adding custom scripts into the<head> section of your website. Step-by-step guide In the Magento Admin Panel, go to toContent>Design>Configuration In the configuration record corresponding to your ...Custom Forms
This article is a summary of how to add custom forms to your site, edit them, and export data. For more information about forms,see the guide here. Navigation, Configuration, and Menus Configuration Creating and Editing a Form Exporting Responses ...How to add HTML Code to Pages
This article covers how to add HTML code that works in the header of all pages of the store's website. This feature is useful for many things, including adding scripts and links for targeting pixels, campaigns, branding, and more. Navigation 1. Log ...How to Add Your Facebook Pixel
This article will guide you through setting up your Facebook Pixel on Magento 2. This article will cover how to add the Facebook Pixel to all pages and to the order success page for conversions. Step 1: Adding Facebook Pixel to All Pages In the ...How to Add/Modify Homepage Slideshow - Porto
This article covers the basics of adding and modifying the slide contents on your homepage. Please note that this tutorial only applies to Porto Themes actively installed. Your slider(s) on the homepage is powered by a JQuery plugin calledOWL ...