Event Tickets: Create an Event - Step 3: Creating Your Event Online
You will need to have completed the following steps before you can create the event product:
- In the Magento Admin Panel, go to Catalog→ Event Tickets by Aheadworks→Events& Tickets
- You will be directed to the Eventspage. Here you will see the list of events that you have setup. This will show both past, current, and upcoming events.
- To create a new event, pressAdd Event

- You will be directed to the New Product page.
Event Configuration

Anything not listed here does not need to be changed.
Top Section (starting with Enable Product)
- Product Name - This will be the customer-facing name of the event.
- This does NOT need to correspond to any Counterpoint Item Number for the ticket.
SKU
If there are commas in the Product Name, they will need to be removed.
The SKU should NOTmatch an Item Number in Counterpoint.
- Tax Class - If tickets are not taxed, change this to None.
- Categories- This will be where you set which customer-facing category the item will fall under.
- Product Name - This will be the customer-facing name of the event.
Content
Description - This will be the customer-facing description of the event.
Images and Videos
 - click this to add an image for the event.
Search Engine Optimization
- Meta Title, Meta Keywords, and Meta Description- This is where you enter your SEO information for the event.
Event Ticket Personalization
- We will cover this in a later section.
Event Ticket Options
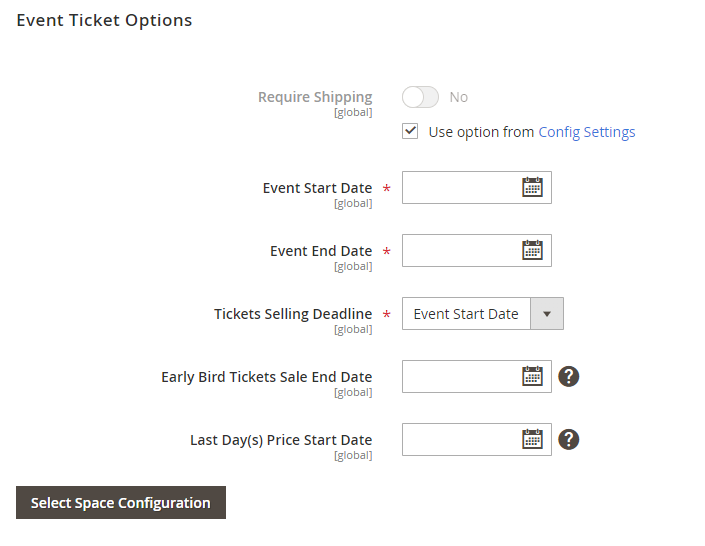
- Event Start Date- Starting date for the event
- Event End Date- End date for the event
- Ticket Selling Deadline - When tickets can last be sold
Space Configuration
- Step 1: Select Venue
- Select the Event Category/Venue for the event

- Step 2: Select Space
- Select the Space for the event.

- Step 3: Summary
- Here you can review to make sure everything is going to be setup as expected.
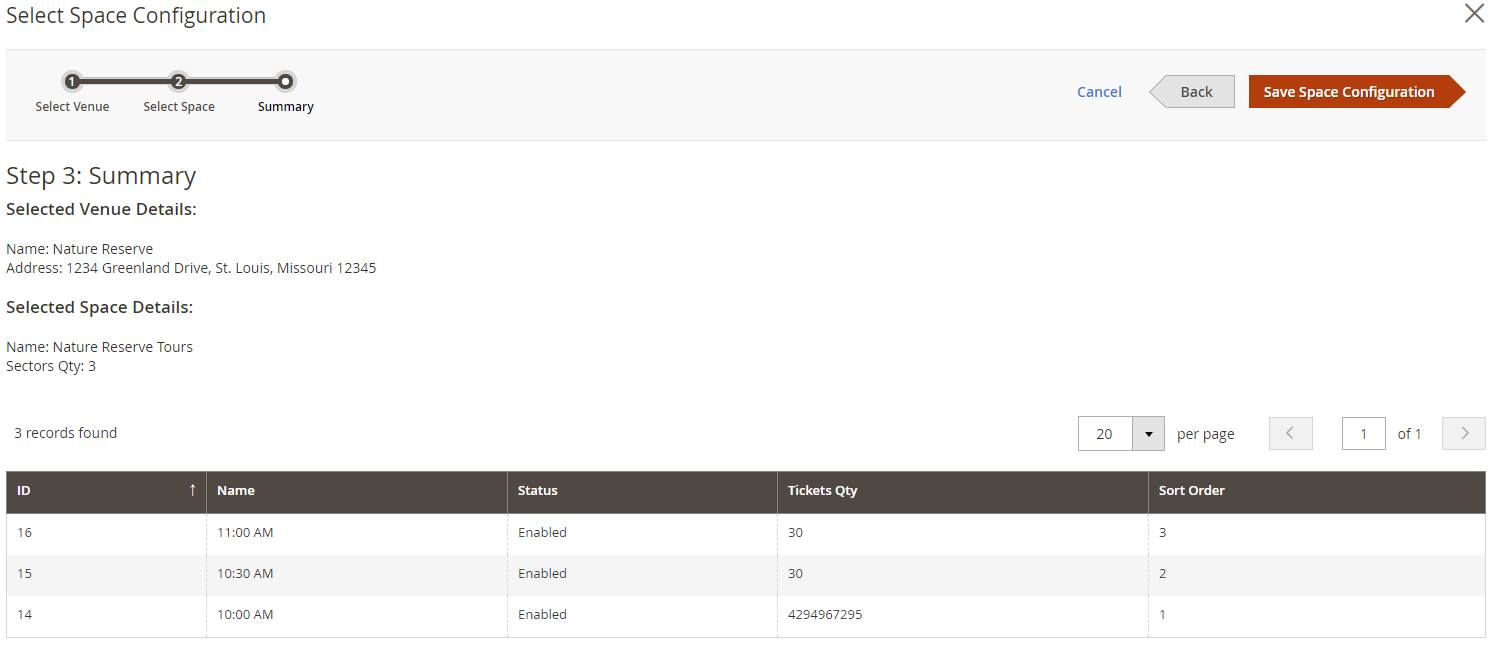
- PressSave Space Configuration.
- Step 1: Select Venue
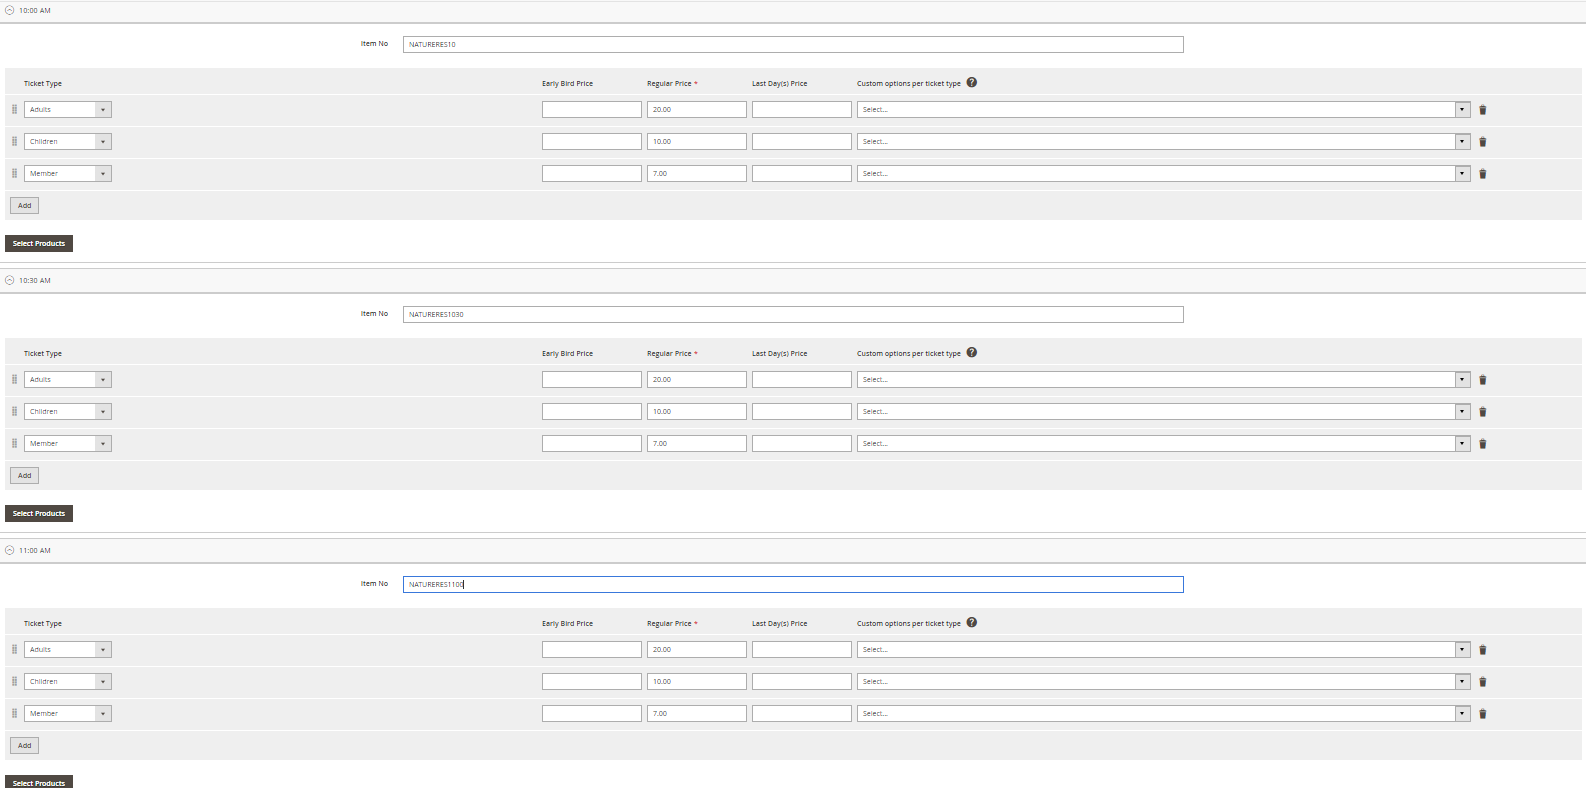
Ticket Setup
- You should now see the following underneath

- Each Sector will look like the following:

- Here you will setup the corresponding ticket item number from Counterpoint, the Ticket Types available for each section (10:00 AM, 10:30 AM, etc.), and the prices of the tickets.
- Item No- the Counterpoint number for the corresponding division
- Ticket Type- the type of ticket, you can add additional ticket types by clickingAdd
- Early BIrd Price- the price of the ticket for purchasing early
- Regular Price- the regular price of the ticket
- Last Day(s) Price- the price of the ticket towards the end of the Tickets Selling Deadline
- Custom options per ticket type- these are additional optional configurations such as Name, Email, Phone Number, Selections, etc. that can be configured in the Event Ticket Personalizationsection
- Here you will setup the corresponding ticket item number from Counterpoint, the Ticket Types available for each section (10:00 AM, 10:30 AM, etc.), and the prices of the tickets.
- Below is an example for the Nature Reserve event:
- Once you have finished setting up the sectors, you can press Save.
- You should now see the following underneath


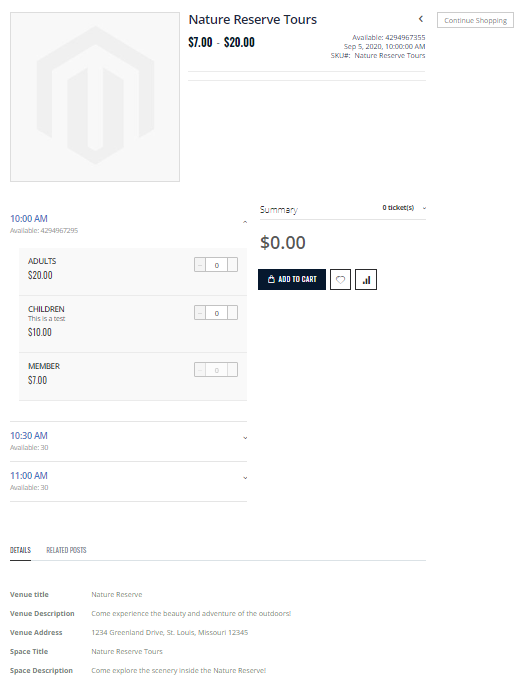
Now, you should see the events on the website and you've made your event!
Related Articles
Event Tickets: Create an Event - Step 1: Creating Your Event in Counterpoint
In this guide, we will be using the example of a Nature Reserve that wants to host a tour event for 10:00 AM, 10:30 AM, and 11:00 AM from September 5 - September 6. The tours will have Adult, Children, and Member pricing. You will need to know how to ...Event Tickets: Create an Event - Step 2: Setting Up Your Event Online
After setting up your event in Counterpoint, you will need to do some configuration for the event online before you finally create it. In this step we setup the different locations within our event, the times or tables available, and the number of ...Event Tickets: Create Your Event with CP-Commerce
Overview We are excited to help you create your online event and start selling tickets through the webstore. In this article, we will outline the flow of how your events will sync between platforms and the general steps to create your events. With ...Event Tickets: Pre-event Setup: Setting Up Event Categories / Venues
Event Categories / Venues In the Magento Admin Panel, go toCatalog→Event Tickets by Aheadworks → Venues You will be directed to theVenuespage. This will show a list of your event categories / venues. Creating a new Event Category / Venue To add a new ...Event Tickets for Magento 2: Overview
Overview Aheadworks Event Tickets for Magento 2 allows you to sell tickets for simple and complex events and check-in customers through the online store. Features Organize events of various venues, spaces, sectors and ticket types Create one-time and ...