Creating a Product and Assigning it to a Category
Instructions for creating a product and assigning it to a category
Step-by-step guide:
Step 1: Create the new product
- Log into Counterpoint
- Click on Inventory on the left-side panel which will bring up various options in the right pane relating to Inventory
- Find Items and click on it to open it

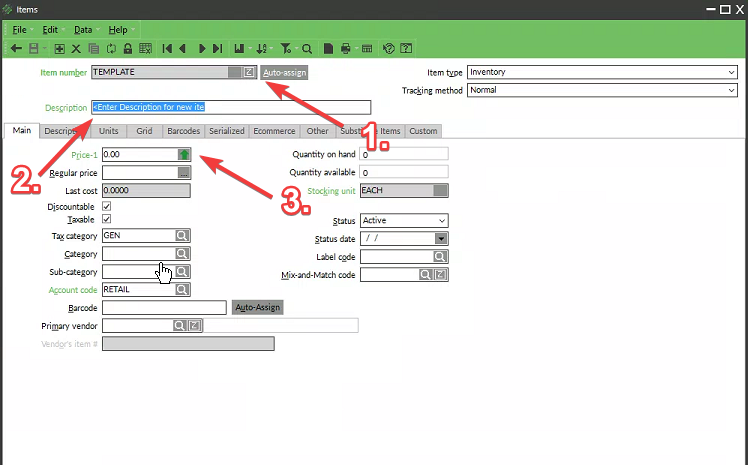
Step 2: Create a new Simple Product
- Enter a new Item Number that another product isn't using and hit enter on the keyboard
- You can enter a description and set a price and set anything else that is needed for this product. Primary Vendor, Tax Category, Stocking Unit, etc.
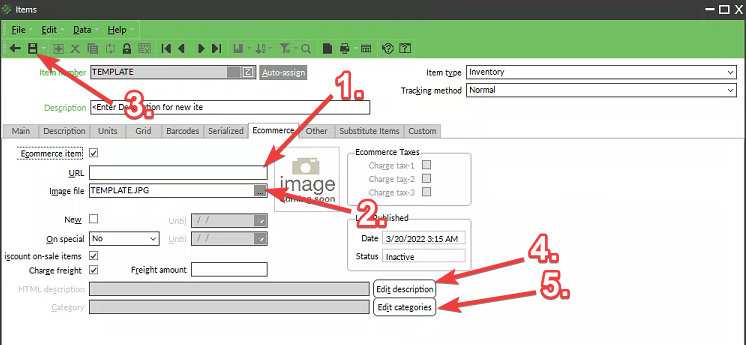
Step 3: E-commerce Tab
- Check the Ecommerce Item checkbox (This is needed for your item to appear in your store)
- There are some things to know about the Image file input.
- Image names MUST match the Item Number that you created in the previous step
- Images CAN NOT be over 2 MB
- Images MUST be uploaded to the Item_Images folder
- Click on the 3 dots to browse your local files and find the image that you would like the product to have
- Edit the HTML Description (This is usually your products description)
- Click on save to edit Category (This is what category it will be assigned to on the website)
NOTE: Category button will greyed out until you save the product.
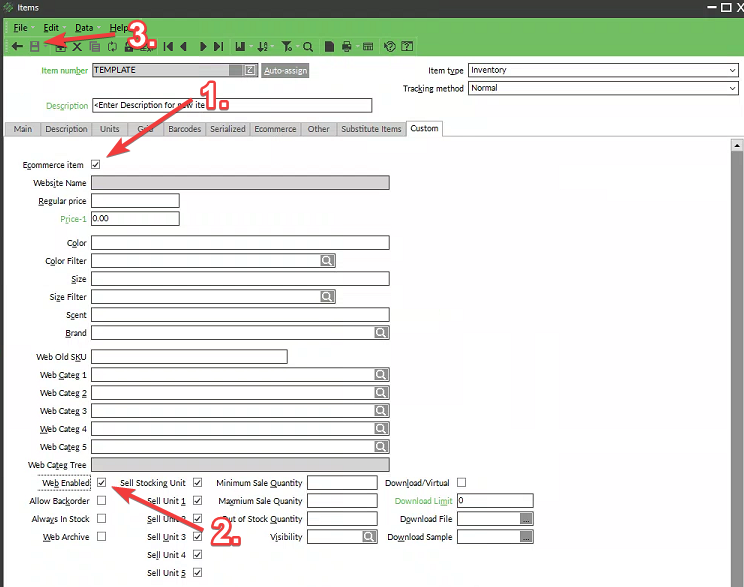
Step 4: Custom Tab (CP-Commerce)
- Click on the Custom Tab (CP-Commerce)
- Enable Ecommerce Item
- Enable Web Enabled
- Save your product again
Once the product sync checks for new/changed products your new product will sync to your Magento Store.
NOTE: Product syncs normally happen every 10 minutes.
Related Articles
Step 2) Create an eCommerce Category Structure
To show you how to setup successful ecommerce categories for CP-Commerce. We recommend that you start with a small group of your best‐selling items, and then continue to add more items later. The sooner your store is up and running, the sooner you ...How To Create Product Attributes
A lot of times there is information that you want to show on the product's page that isn't there by default whether it is a color, category, where an item is from, etc. We can create product attributes in Counterpoint to sync to your website. For ...Magento 2 - Porto: Add a Product Slider at the Bottom of the Product Landing Page
This article will guide you through setting up a product slider at the bottom of your product landing pages. Step 1: Creating the Product Slider First, we need to create the product slider. Login to the Magento Admin Panel. Go to Content>Elements> ...Event Tickets: Create an Event - Step 3: Creating Your Event Online
You will need to have completed the following steps before you can create the event product: Pre-event Setup: Setting Up Ticket Types Pre-event Setup: Setting Up Event Categories / Venues Step 1: Creating Your Event in Counterpoint Step 2: Setting Up ...Creating Promotions Online
Overview With Magento, you can create promotions for your store and customize them as you need for your marketing campaigns. There are two ways to offer promotions: Catalog Price Rules Cart Price Rules Catalog Price Rules When would I want to use a ...